In this tutorial, I'll explain how you can customize or change "Older Posts" and "Newer Posts" links which are present at the bottom of your blog posts. By default, these links are just simple text and most of the users won't even notice that these are actually navigation links. However, we can simply add some spicy CSS (?) or replace these links with beautiful icons.
Important things first!
Before moving on, let me tell you that I'll be using Minima template during this tutorial. If you don't have Minima installed, you can simply install it by going to Layout tab then Pick New Template tab and chose Minima from there.
As we'll be making changes in the template HTML, so it would be better to backup your current layout just in case (?).
Find & Change the Default Styling Code for "Older Posts" & "Newer Posts"
We need to find & change the default code which is responsible for the appearance of blog navigation links. First of all, find the following code from the Layout -> Edit HTML tab:
#blog-pager-newer-link {
  float: $startSide;
 }

#blog-pager-older-link {
  float: $endSide;
 }

#blog-pager {
  text-align: center;
 }
This CSS code is responsible for the style and look of navigation links so just replace the above code with the following:
#blog-pager-newer-link {
  float: $startSide;
 }

#blog-pager-older-link {
  float: $endSide;
 }

#blog-pager {
  text-align: center;
  font: $navfont;
 }

#blog-pager a, #blog-pager a:visited {
  color: $navcolor;
  background: $navbgcolor;
  padding: 5px;
 }

#blog-pager a:hover {
  color: $navhovercolor;
  background: $navhoverbgcolor;
  padding: 5px;
 }
Make Navigation Links Customizable Through Fonts & Colors Tab
To edit the links through Fonts and Colors tab, we need to do some more coding work. Don't worry, for you, it will be only copy-paste stuff. Now, in Edit HTML tab, scroll down a little and you'll see some code like this:
/* Variable definitions
   ====================
   <Variable name="bgcolor" description="Page Background Color"
             type="color" default="#fff" value="#ffffff">
   <Variable name="textcolor" description="Text Color"
             type="color" default="#333" value="#333333">
   <Variable name="linkcolor" description="Link Color"
             type="color" default="#58a" value="#5588aa">
Please note that I'm not displaying the full code, this is just to give you an idea. Alright, now you have to put the following code in the above mentioned code [View Screen Shot]:
   <Variable name="navcolor" description="Links Text Color"
             type="color" default="#fff" value="#ffffff">
   <Variable name="navhovercolor" description="Links Text Hover Color"
             type="color" default="#000" value="#000000">
   <Variable name="navbgcolor" description="Links Background Color"
             type="color" default="#FE6602" value="#FE6602">
   <Variable name="navhoverbgcolor" description="Links Background Hover Color"
             type="color" default="#FFD25F" value="#FFD25F">
   <Variable name="navfont" description="Links Font"
             type="font"
             default="normal normal 15px 'Trebuchet MS',Trebuchet,Arial,Verdana,Sans-serif" value="normal normal 15px 'Trebuchet MS',Trebuchet,Arial,Verdana,Sans-serif">
Save your template and resulting code in Edit HTML tab would look something like this [View Screen Shot]!
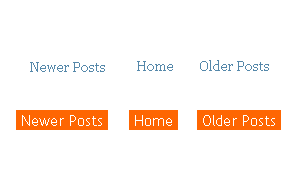
So, now coding time is over and you can simply go to the Fonts and Colors tab and start editing the "Older Posts" & "Newer Posts" links. You'll find them at the top of the list there.
Links Text Color
It will only change the color of all the navigation links and you'll be able to see the preview instantly.
Links Text Hover Color
This setting represents the color of the links when mouse comes over the link otherwise known as hover effect. You won't see the preview of this setting. To see the result, you'd have to save changes and then see the blog in real time.
Links Background Color
This is the background color of the links in normal state and it can be seen instantly in preview mode.
Links Background Hover Color
Again, this is the background color only when mouse comes over the link and you'd have to save and then see the template to see the result.
Links Font
It will allow you to modify the font of navigation links.
Change the "Older Posts" & "Newer Posts" Text
You can also change the text and replace it with something else like Next & Previous. Before moving on make sure you check Expand Widget Templates.
Change "Older Posts"
Find <data:olderPageTitle/> and replace it with something else like Previous or Previous Page. This text is actually "Older Posts".
Change "Newer Posts"
Find <data:newerPageTitle/> and replace it with some other text like Next or Next Page. This text actually prints "Newer Posts".
Final Words
I've tried my best to explain everything I know in the easiest possible way. This tutorial is free and helpful so please help promoting it by sharing it with friends, commenting here, linking to this tutorial page or main page. If you need any kind of help regarding Blogger, feel free to ask.
No comments:
Post a Comment