Showing posts with label Fonts. Show all posts

Saturday, August 6, 2011

How To Change Post Title Color in Picture Window Blogspot Template

By default, there is no option to change post title color in Blogger Designer Templates. I've already written a tutorial to do that but users of Picture Window template are having problems. Here is a tutorial to change post title color in Picture Window template.

Note: If you're using other templates then see this tutorial:
Blogspot How To: Change Post Title Color in Blogger-Blogspot Template Designer Templates

Steps to Change Post Title Color in Picture Window Template


  1. Open the Template section.
  2. Blogger Updated Dashboard
  3. Click the Edit HTML button.
  4. Blogger Edit HTML Button
  5. A new window will open. You'd have to click the Proceed button to start editing.
  6. Blogger Proceed Button
  7. Find the following code:
       <Group description="Post Title" selector="h3.post-title, .comments h4">
    <Variable name="post.title.font" description="Title Font" type="font"
    default="normal normal 18px Arial, Tahoma, Helvetica, FreeSans, sans-serif" value="normal normal 18px Arial, Tahoma, Helvetica, FreeSans, sans-serif"/>
    </Group>

    Tip: You can press 'Ctrl + f' keys or simply scroll down the HTML a bit to find the code.

  8. Replace the previous code with the following code:
       <Group description="Post Title" selector="h3.post-title, .comments h4">
    <Variable name="post.title.font" description="Title Font" type="font"
    default="normal normal 18px Arial, Tahoma, Helvetica, FreeSans, sans-serif" value="normal normal 18px Arial, Tahoma, Helvetica, FreeSans, sans-serif"/>
    <Variable name="post.title.color" description="Color" type="color" default="#FE6602" value="#FE6602"/>
    <Variable name="post.title.hover.color" description="Hover Color" type="color" default="#FFD25F" value="#FFD25F"/>
    </Group>
  9. Now find this code:
    h3.post-title {
    margin: 0;
    font: $(post.title.font);
    }
  10. Replace the above code with this code:
    h3.post-title {
    margin: 0;
    font: $(post.title.font);
    color: $(post.title.color);
    }

    h3.post-title a {
    color: $(post.title.color);
    }

    h3.post-title a:hover {
    color: $(post.title.hover.color);
    }
  11. Click Save template and then Close button.
  12. Blogger Save Template Close Buttons
  13. Now go to Template Designer then Advanced and edit the Post Title option.


  14. You can simply edit the post color and post hover color from here.
  15. Enjoy!

Sunday, February 6, 2011

How to Change Jump Break (Read More) Font, Color & Background Color in Blogger Template Designer


Blogger officially supports 'after the jump' summaries. You can insert a jump break anywhere in a post to make it short on the blog homepage. The part after the jump break will be visible only when user will click on the Jump Break or Read More link. In this tutorial, we'll add some coding in the template HTML. After that, you'd be able to change the font, color or even the background color of the Jump Break or Read More from the Template Designer.

Update!: This tutorial has been updated on 08/06-2012. Now, it can be applied to any default Blogger template without errors.

What is Jump Break or Read More Link?


If you don't know anything about Jump Break or Read More links, please read the following article in the official Blogger help.

Creating 'After the jump' summaries

Steps


Follow these simple steps to complete this Blogspot tutorial.
  1. Open the Template section.
  2. Blogger Updated Dashboard
  3. Click the Edit HTML button.
  4. Blogger Edit HTML Button
  5. A new window will open. You'd have to click the Proceed button to start editing.
  6. Blogger Proceed Button
  7. Scroll down a bit and you'll see this code:
    /* Variable definitions
    ====================
    Tip: Windows users can press 'Ctrl + f' to fing the code.
  8. Replace the above code with the following code:
    /* Variable definitions
    ====================

    <Group description="Read More" selector=".jump-link">
    <Variable name="readmore.font" description="Font" type="font"
    default="normal normal 12px Arial, Tahoma, Helvetica, FreeSans, sans-serif" value="normal normal 30px 'Courier New', Courier, FreeMono, monospace"/>
    <Variable name="rm.link.color" description="Link Color" type="color" default="#FFFFFF" value="#666666"/>
    <Variable name="rm.link.hover.color" description="Link Hover Color" type="color" default="#222222" value="#f5f5f5"/>
    </Group>

    <Group description="Read More Background" selector=".jump-link">
    <Variable name="rm.bg" description="Background Color" type="color" default="#00000" value="#222222"/>
    </Group>
  9. After that, find ]]></b:skin> and replace it with the following code:
    .jump-link { float: right; font: $(readmore.font); background: $(rm.bg); }
    .jump-link a, .jump-link a:visited { color: $(rm.link.color); }
    .jump-link a:hover { color: $(rm.link.hover.color); }
    ]]></b:skin>
  10. Now, save your template.
  11. After saving template, open the 'Template Designer'.
  12. In 'Template Designer', expand the Advanced tab and you'll see "Read More Link" tab at the top.


  13. You can change the font, color and background color and instantly see the preview. However, changes in hover link color will not be visible in the preview.
  14. After customizing the Jump Break or Read More link, click 'APPLY TO BLOG' link to save your changes.

Friday, February 4, 2011

Blogspot How To: Change Post Title Color in Blogger Template Designer Templates


I have received a lot of comments on a previous post. Readers are asking how to change the post title color in the new Blogger Template Designer templates. Well, here is a very simple step by step tutorial for you.We'll make some changes in the template CSS and then you'll be able to customize post title without any coding stuff.

Warning: Before making any changes, you must backup your existing layout:

Blogspot How to: Backup Your Blogger (Blogspot) Template

Steps to Make Post Title Font Customizable in the Blogger Template Designer Templates.


  1. Open the Template section.
  2. Blogger Updated Dashboard
  3. Click the Edit HTML button.
  4. Blogger Edit HTML Button
  5. A new window will open. You'd have to click the Proceed button to start editing.
  6. Blogger Proceed Button
  7. Find the following code:
    /* Variable definitions
    ====================
  8. REPLACE the above code with the following one:
    /* Variable definitions
    ====================

    <Group description="Post Title Color" selector="h3.post-title">
    <Variable name="post.title.link.color" description="Link Color" type="color" default="#ff0000" value="#ff0000"/>
    <Variable name="post.title.hover.color" description="Link Hover Color" type="color" default="#0000ff" value="#00ffff"/>
    <Variable name="post.title.color" description="Color on Post Page" type="color" default="#ff00ff" value="#ff00ff"/>
    </Group>

    Don't save or preview your template yet. Proceed to the next step.
  9. Now find this code:
    ]]></b:skin>
    and REPLACE it with the following one:
    h3.post-title { color:$(post.title.color); }
    h3.post-title a, h3.post-title a:visited { color:$(post.title.link.color); }
    h3.post-title a:hover { color:$(post.title.hover.color); }

    ]]></b:skin>
  10. Click the Preview button. You'll see the post title color as blue. Don't worry you can change it later in Blogger Template Designer. Save your template and click the Close button.

Hurray, Coding Done! Go & Customize the Post Title in Template Designer!


Simply click the Customize tab to open the Blogger Template Designer. Select Advanced from the left options. You'll see Post Title Color at the top.:


There are 3 options in the Post Title Color. Here is their detail:


Link Color: This is the color of the post title as a link. Any change to this option will appear in the Template Designer.


Link Hover Color: This color will appear when someone brings mouse over the post title. Any change to this option will not be visible in the Template Designer. You'd have to Apply the change, open the blog and bring your mouse over the post title to see the change in color.


Color on Post Page: This is the color of the post title on post page when post title is not a link. Again, you'd have to Apply the change and open some post title page to see the affect.


Help BetaTemplates!


If this tutorial was helpful then please add a link back to BetaTemplates on your blog. The link code is available at the bottom of this page.

Wednesday, July 8, 2009

How to Change Post Body Font Size, Color & Style

You can customize post body font in any expect like color, size, style or family. First, you should know what is the default CSS code for post body and then we'll customize it according to our own taste. Go to Layout | Edit HTML and find this code:

The default code of posts!


.post {
margin:.5em 0 1.5em;
border-bottom:1px dotted $bordercolor;
padding-bottom:1.5em;
}

Understand the default code!


1- margin:.5em 0 1.5em; is defining spacing between post and other elements in the blog like sidebar and header.

2- border-bottom:1px dotted $bordercolor; it very descriptive. It creates a dotted border at the bottom of the post with width 1px.

3- padding-bottom:1.5em; causes some space between posts and other elements at the bottom. The other elements could be labels, comments or date.

Make changes in the default code!


Now, I've given you some idea about the post body style definitions. By default, the font properties are not defined specifically for posts but we can easily do this by applying some simple CSS techniques.

1- How to change font size in post body!

You need to add font-size:15px; property in the default CSS code:

.post {
margin:.5em 0 1.5em;
border-bottom:1px dotted $bordercolor;
padding-bottom:1.5em;
font-size:15px;
}

Tip: Try increasing or decreasing 15px to increase or decrease font size.

2- How to change font color in post body!

You need to add color:#FFFFFF; in the default definitions:

.post {
margin:.5em 0 1.5em;
border-bottom:1px dotted $bordercolor;
padding-bottom:1.5em;
color:#FFFFFF;
}

Tip: #FFFFFF is the hex code for white color, you can capture any color you see on your computer or on web and get the hex code of that color through a free utility ColorPic.

Remember: This property will not effect hyperlinks (?) in the post body, I'll tell you about hyperlinks customization later in this article.

3- How to change the font family in post body!

Font family means that you can control which font will be used to display post body. You can have Arial, Times New Roman, Georgia, Serif and many many more. So, you'll need to apply font-family:"Times New Roman",Georgia,Serif; property for this purpose.

.post {
margin:.5em 0 1.5em;
border-bottom:1px dotted $bordercolor;
padding-bottom:1.5em;
font-family:"Times New Roman",Georgia,Serif;
}

Tip: I've added 3 fonts in font-family:"Times New Roman",Georgia,Serif; property, why? Because my user might not have Times New Roman installed on his/her computer then the second font Georgia will be used and similarly Serif can also be used.

Tip: See following article about CSS font family properties for information.

http://www.w3schools.com/css/pr_font_font-family.asp

4- How to change the style of post body font!

Remember: You might not need this property but this is useful for better understanding of your fonts.

By style, I mean you can make your font italic through font-style:italic; property.

.post {
margin:.5em 0 1.5em;
border-bottom:1px dotted $bordercolor;
padding-bottom:1.5em;
font-style:italic;
}

Remember: If you'll not add this property in default definitions then your post body font will be displayed normal.

Tip: Blogger post editor provides an easy way to make specific part of text italic. When creating a post, select your text and click the i icon which is the second icon on toolbar.

How to apply these properties on hyperlinks in the post body!


Some of the above described properties will not effect hyperlinks (?) in the post body and there are no definitions in default Blogger CSS for hyperlinks (?) so lets add our own definitions.

This is the deafault code:

.post {
margin:.5em 0 1.5em;
border-bottom:1px dotted $bordercolor;
padding-bottom:1.5em;
}

Add some more juice in it:

.post {
margin:.5em 0 1.5em;
border-bottom:1px dotted $bordercolor;
padding-bottom:1.5em;
}
.post a {
color:#FF0000;
text-decoration:underline;
text-transform:uppercase;
}

Now, I'll explain all 3 properties added in .post a {} tag.

1- color:#FF0000; is the hex code for red color, you can hex code of some other color to change it.

2- text-decoration:underline; will make your post hyperlinks (?) underlined, you can change this to text-decoration:none; if you don't want to apply it.

3- text-transform:uppercase; will change your hyperlinks (?) to transform to uppercase. You can change it to text-transform:lowercase; if you want your hyperlinks to display in lowercase or you can change it to text-transform:none; to nullify this effect.

How to customize the hyperlinks for mouse over event (hover effect)!


You can also further customize the font appearance when mouse comes over your hyperlinks. For example you might want to change the color of your hyperlinks on mouse over or make it underlined or maybe change the font size.

This is our default CSS + hyperlinks CSS we added in the previous steps:

.post {
margin:.5em 0 1.5em;
border-bottom:1px dotted $bordercolor;
padding-bottom:1.5em;
}
.post a {
color:#FF0000;
text-decoration:underline;
text-transform:uppercase;
}

Add even more juice in it:

.post {
margin:.5em 0 1.5em;
border-bottom:1px dotted $bordercolor;
padding-bottom:1.5em;
}
.post a {
color:#FF0000;
text-decoration:underline;
text-transform:uppercase;
}

.post a:hover {
color:#0000FF;
text-decoration:none;
text-transform:lowercase;
}

Now, I'll explain some changes I've made.

Note: All the properties in .post a:hover {} will be visible only when you'll move mouse over the link.

1- The color will change to blue (#0000FF).

2- There will be no decoration of text. Previously, we applied text-decoration:underline; property to make our hyperlinks underlined but when mouse will come over, it will not be underlined.

3- On mouse over, our hyperlinks will become lowercase.

Tip: "On mouse over" is called "hover effect" in CSS references.

Before you leave!


I've tried my best to share my knowledge with you, if this article has really helped you then you can comment or tell other people about it through social networking. Any question, comment or suggestion will be greatly appreciated, thanks.

Saturday, June 20, 2009

How to Change Sidebar Title Font, Size & Color

Blogger sidebar title fonts are very easily customizable like any other section. You just need to find the default CSS definitions of these titles and then we can easily implement our own styles in it.

Let's first check the default style definitions for these titles:


To find this code, go to Layout | Edit HTML and search.

h2 {
margin:1.5em 0 .75em;
font:$headerfont;
line-height: 1.4em;
text-transform:uppercase;
letter-spacing:.2em;
color:$sidebarcolor;
}

1- Change family i.e. Arial, Times New Roman etc.


Currently, sidebar title font is defined by font:$headerfont;. It means that your header font and sidebar title font is same but we can have them according to our wish by adding a font-family property.

h2 {
margin:1.5em 0 .75em;
font-family:"Times New Roman",Georgia,Serif;
line-height: 1.4em;
text-transform:uppercase;
letter-spacing:.2em;
color:$sidebarcolor;
}

Info: As you can see that I've added 3 fonts (Times New Roman, Georgia, Serif) because a visitor might not have the 'Times New Roman' font installed on his/her computer, so the browser can chose the other two fonts of first-come first-serve basis.

2- Change size.


Simply add font-size property in the default code.

h2 {
margin:1.5em 0 .75em;
font:$headerfont;
line-height: 1.4em;
text-transform:uppercase;
letter-spacing:.2em;
color:$sidebarcolor;
font-size:40px;
}

Note: I've added font-size:40px; in which 40px is the size. You can change it according to your wish because 40px is fairly large number.

3- Change color i.e. red, green etc.


Currently, color:$sidebarcolor; property is defining the color. It means that title color is dependent on the sidebar color i.e. sidebar color and title color is same. We can add our own color in it by removing color:$sidebarcolor; and adding color property.

h2 {
margin:1.5em 0 .75em;
font:$headerfont;
line-height: 1.4em;
text-transform:uppercase;
letter-spacing:.2em;
color:#0000FF;
}

Remember: #0000FF is the hex code of blue color.

Tip: You can capture any color on screen and get it's hex code to use it any where, download ColorPic which is a free utility to do that.

Friday, June 19, 2009

How to Change Header Title Font, Size & Color

Intro!

This is a simple Blogger tut to tell you how to change the header title font. First of all, you should know which CSS code is responsible for your header title appearance:


#header h1 {
margin:5px 5px 0;
padding:15px 20px .25em;
line-height:1.2em;
text-transform:uppercase;
letter-spacing:.2em;
font: $pagetitlefont;
}


How to modify the style???


Now you know the CSS of your title. You can make modifications in it and see your results. Remember, these CSS changes will be visible only on main page because your header title behaves as a link in all other pages. First, let's customize it's appearance on main page.

----------------------------------------------------------------------------------
=> Add a 'font-family' Property!
----------------------------------------------------------------------------------

I want my header title to be in 'Arial' font, the code will be:

#header h1 {
margin:5px 5px 0;
padding:15px 20px .25em;
line-height:1.2em;
text-transform:uppercase;
letter-spacing:.2em;
font-family: arial, "lucida console", sans-serif;
}

Please note that I'm using 3 fonts (arial, "lucida console", sans-serif) in the above CSS. The reason is that if 'Arial' is not available on your visitor's pc then the font on 2nd position ("lucida console") will be used.

----------------------------------------------------------------------------------
=> Add Style Definitions for Header Title Font on Pages Other Than Main Page!
----------------------------------------------------------------------------------

As I told you before that your header title works as a hyperlink in all other pages of your blog other than the main page, so let's add some more CSS to customize the appearance on pages other than the main page.


#header h1 {
margin:5px 5px 0;
padding:15px 20px .25em;
line-height:1.2em;
text-transform:uppercase;
letter-spacing:.2em;
font: $pagetitlefont;
}

/* I've added a new tag which will change header title appearance on pages other than main page */

#header h1 a {
text-decoration:none; /* you can add 'underline' or 'overline' instead of 'none' */
color: #FFFFFF; /* you can add any color you want by changing 'FFFFFF' */
font-size: 25px; /* means title font size will be 25px on all pages other than the main page */
}

/* hover definitions will become alive when you bring mouse over title, this will also work on all pages other than main page */

#header h1 a:hover {
text-decoration:underline; /* title font will be underlined on mouse over */
color: #000000; /* title will become black on mouse over */
font-size: 10px; /* guess what will happen to font size on mouse over */
}

Good to Know!

I always try my best to share all the knowledge I've with you guys. You can always do experiments and share your results with me in comments. You should go to W3Schools.Org to read more about font properties.

Thursday, June 18, 2009

Blogspot How to: Change Post Title Font, Size & Color

The default Blogger-Blogspot layouts (like Minima) don't allow you to change or customize the look of post title font through Fonts & Colors tab. An HTML/CSS expert can easily change the post title font from the Edit HTML tab but that's not easy for a non-technical person. In this tutorial, I'll tell you how to fully customize the post title font by going to Design -> Template Designer -> Advanced.

Note: This tutorial is for those who are still using the old layout templates like Minima. If you're using a new template like Awesome Inc, Simple, Picture Window, Ethereal, travel or Watermark then refer to the new tutorial: Blogspot How To: Change Post Title Color in Blogger Template Designer


Warning: Before making any changes, you should backup your current template.


1- Find the Existing CSS Code.


From the Dashboard, go to Design then Edit HTML tab.


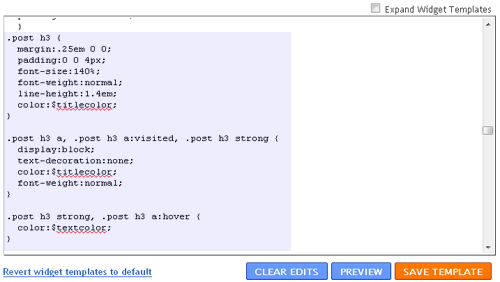
Find the following code:

.post h3 {
margin:.25em 0 0;
padding:0 0 4px;
font-size:140%;
font-weight:normal;
line-height:1.4em;
color:#333333;
}

.post h3 a, .post h3 a:visited, .post h3 strong {
display:block;
text-decoration:none;
color:#000000;
font-weight:normal;
}

.post h3 strong, .post h3 a:hover {
color: #000000;
}


Blogspot How to: Change Post Title Font, Size & Color


The code, you found above, is responsible for the appearance of post title. If you're not using Minima Blogger-Blogspot template then you might not be able to find this code so please leave your comment with blog address and I'll try to help. If you've found the code then continue with the tutorial.

2- Replace the Existing CSS Code With New CSS Code.


In this step, you have to replace the default code with the following code:

.post h3 { margin: .25em 0 0; padding: 0 0 4px; color: $titlecolor; font: $posttitlefont; }
.post h3 a, .post h3 a:visited, .post h3 strong { text-decoration: none; color: $titlecolor; }
.post h3 strong, .post h3 a:hover { color: $titlehovercolor; }


3- Customize the Post Title Font in Design -> Template Designer -> Advanced Tab


Stay in the Edit HTML tab. Scroll down a little and you'll find this code:

/* Variable definitions
====================


Copy and paste the following code right below the above code:

<Variable name="titlecolor" description="Post Title Color"
type="color" default="#c60" value="#cc6600">
<Variable name="titlehovercolor" description="Post Title Hover Color"
type="color" default="#c60" value="#cc6600">
<Variable name="posttitlefont" description="Post Title Font"
type="font" default="normal normal 18px 'Trebuchet MS',Trebuchet,Arial,Verdana,Sans-serif" value="normal normal 18px 'Trebuchet MS',Trebuchet,Arial,Verdana,Sans-serif">


After adding the above codes, the result would look something like this:

/* Variable definitions
====================
<Variable name="titlecolor" description="Post Title Color"
type="color" default="#c60" value="#cc6600">
<Variable name="titlehovercolor" description="Post Title Hover Color"
type="color" default="#c60" value="#cc6600">
<Variable name="posttitlefont" description="Post Title Font"
type="font" default="normal normal 18px 'Trebuchet MS',Trebuchet,Arial,Verdana,Sans-serif" value="normal normal 18px 'Trebuchet MS',Trebuchet,Arial,Verdana,Sans-serif">


After that, you can just save your template. Now, you can easily customize the post title font through Design -> Template Designer -> Advanced tab.

Need Help?


If you've any problem in this tutorial the feel free to leave a comment, I'll try to answer as soon as possible :-)

Sunday, June 7, 2009

What Are Custom Fonts & How to Use Google Custom Fonts in Your Blog

Add Beautiful Fonts in Blogger Blogs Using Google Fonts

Google has recently launched a new service which lets you easily use amazing fonts in any blog. These fonts are powered by JavaScript code which is hosted by Google so you don't have to worry about it. Currently, only 18 fonts are available but we can expect that number to grow. For example, this text is written in Lobster font. These fonts are search engine friendly and work in all browsers.

How to Add Google Fonts in Blogger Blogs


Google has made it really easy for anyone to embed a font in the blog. Just follow these steps:

1- Go to Google Font Directory.

2- Select a font from the list there, I'm using Lobster web font by Pablo Impallari.

3- On the next page, click Get the code link.

4- You'll see some code which looks something like this:

<link href='http://fonts.googleapis.com/css?family=Lobster' rel='stylesheet' type='text/css'>

Note:
This is the code we need but when I copied and used this code in Blogger, an error occurred. To deal with the error, you have to close the link tag by adding /(slash) right before > in the above code and it would look something like this:

<link href='http://fonts.googleapis.com/css?family=Lobster' rel='stylesheet' type='text/css'/>

So, whichever font you use, just add a / before > in the code of that font. For now, copy the above code and go to your Blogger account.

5- Go to Design then Edit HTML tab and find </head>. After that, paste the step 4 code right before </head> tag. The result would look something like this:

<link href='http://fonts.googleapis.com/css?family=Lobster' rel='stylesheet' type='text/css'/>
</head>


After adding the code, save your template.

6- Now, we can use this font in headings and text. For example, if you want to use the web font in posts then use some code like this:

<span style="font-family: Lobster;">Any text here will be displayed by a web font like Lobster in this tutorial.</span>

How to Use Google Fonts in Posts/Sidebar/Header Headings?


You can also use the embedded web font in any heading of the blog. All templates have different structure that's why I can't write about each and every template. You can post your blog address in the comments and tell me in which part of the blog you want to use an embedded web font. I'll try to reply as soon as possible, thanks.