Showing posts with label Social Bookmarking. Show all posts

Friday, August 13, 2010

Blogspot How To: Add the Official Twitter Tweet Buttons in Blogger

Blogspot How To: Use the Official Twitter Tweet Buttons

Twitter is the most popular social networking site on internet. People share links on Twitter which receive a lot of traffic. You can also add the official Twitter tweet button with or without counter. This button will enable your blog visitors to easily share useful links on their Twitter accounts.

Get the Button Code!


First of all go to http://twitter.com/goodies/tweetbutton. Now follow these steps to get the code:

  1. Select the button from 3 available choice.

  2. If you've a Twitter account then enter your username in the second field. By doing this, whenever someone will share your blog post on Twitter, your username will also be added to that tweet. If you don't have a Twitter account, I strongly recommend to make one but, for now, you can skip this option.

  3. Copy the code from the box.


Add the Code in Your Blog!


Now we need to add the Twitter tweet button code in our Blogger blog. So, go to Design and then Edit HTML tab. Check Expand Widget Templates box. Search for this code:
<data:post.body/>

Place Twitter tweet button code immediately after the above code. You can also place the Twitter tweet button code immediately before the above code but then the Twitter button will appear between the post title and body.

Add Custom Text in the Twitter Tweet Button!


You can also add your own message in the Twitter button. For example if you want to add Hey, check it out: THE POST TITLE then you need to change expr:data-text='data:post.title' to expr:data-text='“Hey, check it out:“+data:post.title'.

Display Twitter Button Only on Post Pages!


If you want the tweet button to appear only on post pages then you need to change the button code. Now, your code will look something like this:
<b:if cond='data:blog.pageType == &quot;item&quot;'>
Twitter Tweet Button Code HERE
</b:if>
Thursday, July 8, 2010

Blogspot How to: Add the Official Share Buttons

Blogspot How to: Add the Official Share Buttons

Blogger has officially announced sharing buttons. These buttons let your readers share posts on social networks like Twitter, Facebook & Google Buzz. These sites bring traffic and are important for search engine rankings. The great thing is that the share buttons automatically shortens post URL/address because Twitter allows only 160 characters per tweet.

How to Add Share Buttons?


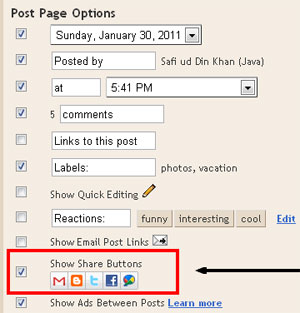
Adding share buttons under Blogger posts is very easy. Just go to Design | Page Elements. Edit the Blog Posts gadget and enable Show Share Buttons option. Click the following image to see full size:

How to add Blogger share buttons in posts

What to Do If Share Buttons Doesn't Appear?


If you're using an old template then there is a chance that share buttons won't show up even if you've enabled them. So, go to Design | Edit HTML and check Expand Widget Templates option. The page will automatically refresh. After that, find this code:
    <data:post.body/>

and REPLACE it with the following code:

    <data:post.body/>
<div class='post-share-buttons'>
<b:include data='post' name='shareButtons'/>
</div>

Important: After that save your template and go to Page Elements tab. Click Edit on the Blog Posts widget. A new window will appear, in that window check the option which says Show Share Buttons. Save your changes and now you'll be able to see share buttons on your blog.

How to Show Share Buttons Only on Post Pages!


By default, share buttons will appear on all pages. It might look a little messy and some people might want share buttons to appear only on post pages. To do that, you need to add a simple if-else condition. Instead of the above code, add this code after <data:post.body/>:
<b:if cond='data:blog.pageType == &quot;item&quot;'>
<div class='post-share-buttons'>
<b:include data='post' name='shareButtons'/>
</div>
</b:if>

If you've any problem, feel free to leave me a comment.

Update! Share Buttons are Grey


Many of you guys are complaining that the share buttons are appearing in Grey color. Well, don't worry about that because that's how they should appear. I don't know any method (yet) to make them colored. By default, they are Grey and will only become colorful when you'll bring mouse over them.

Tuesday, July 14, 2009

Blogspot How to: Add Social Bookmarking Icons in Blog Posts Footer


Social bookmarking services such as StumbleUpon, Digg & Reddit (->My love) are really popular these days & if a blog post makes it's way to the front page of these services then it's your lucky day. The concept is simple; people browsing web share their favorite bookmarks with others through these services. You can install these icons in your post footer so that your visitors can easily share a post.

Remember: Backup your template before moving on.


Steps to Add the Social Bookmarking Icons.


  1. Go to Layout | Edit HTML.
  2. Check Expand Widget Templates, the page will automatically refresh.
  3. After that press Ctrl + f and search for this code:
    <div class='post-body entry-content'>
    <data:post.body/>
    <div style='clear: both;'/> <!-- clear for photos floats -->
    </div>
  4. Now, place the following code right after the previous step code:
    <b:if cond='data:blog.pageType == &quot;item&quot;'>
    <big><big><big> Share this post! </big></big></big>
    <div class='spacer' style='margin-top:10px;margin-bottom:10px;border-top:solid 1px #DEDEDE;'/>
    <div class='social-table'>
    <table border='0' cellpadding='0' cellspacing='0' width='100%'>
    <tr>
    <td valign='top' width='50%'><table border='0' cellpadding='0' cellspacing='0' width='222'>
    <tr>
    <td height='24' width='24'><img border='0' height='16' src='http://lh3.ggpht.com/_TqPdHmAEwTM/SgxdHoRIprI/AAAAAAAAEC4/UOmW1Zfg04I/facebook.png' width='16'/></td>
    <td height='24'><a expr:href='&quot;http://www.facebook.com/share.php?u=&quot; +data:post.url'><strong>Share on Facebook</strong></a>
    </td>
    </tr>
    <tr>
    <td height='24'><img border='0' src='http://lh4.ggpht.com/_TqPdHmAEwTM/SgxdH2E0JsI/AAAAAAAAEDE/HTXaxE7_KaU/twitter.png'/></td>
    <td height='24'><a expr:href='&quot;http://twitthis.com/twit?url=&quot; + data:post.url + &quot;&amp;title=&quot; + data:post.title'><strong>Share on Twitter</strong></a>

    </td>
    </tr>
    <tr>
    <td height='24'><img border='0' height='16' src='http://lh3.ggpht.com/_TqPdHmAEwTM/SgxiZxfvTGI/AAAAAAAAEDU/AvuLyM_PGa4/stumble.png' width='16'/></td>
    <td height='24'><a expr:href='&quot;http://www.stumbleupon.com/submit?url=&quot; +data:post.url'><strong>Share on StumbleUpon</strong></a></td>
    </tr>
    <tr>
    <td height='24'><img border='0' height='16' src='http://lh6.ggpht.com/_TqPdHmAEwTM/Sgxdp40mQUI/AAAAAAAAEDM/_Nee9ul6zpc/s128/delicious.png' width='16'/></td>
    <td height='24'><a expr:href='&quot;http://del.icio.us/post?url&quot; +data:post.url'><strong>Share on Delicious </strong></a></td>
    </tr>
    <tr>
    <td height='24'><img border='0' height='16' src='http://lh4.ggpht.com/_TqPdHmAEwTM/SgxjIHpTaiI/AAAAAAAAEDY/pZtBL9woxzw/reddit.png' width='16'/></td>
    <td height='24'><strong><a expr:href='&quot;http://www.reddit.com/submit?url=&quot; +data:post.url'>Share on Reddit</a></strong>
    </td>

    </tr>
    </table></td>
    <td valign='top' width='50%'><table border='0' cellpadding='0' cellspacing='0' width='222'>
    <tr>
    <td height='24' width='24'><img border='0' height='16' src='http://lh4.ggpht.com/_TqPdHmAEwTM/SgxkjUlW8eI/AAAAAAAAEDc/iDE9H_-vX9w/digg.png' width='16'/></td>
    <td height='24'><a expr:href='&quot;http://digg.com/submit?phase=2&amp;url=&quot; + data:post.url + &quot;&amp;title=&quot; + data:post.title' target='_blank'><strong>Share on Digg </strong></a></td>
    </tr>
    <tr>
    <td height='24'><img border='0' height='16' src='http://lh5.ggpht.com/_TqPdHmAEwTM/Sgx1uAMIp7I/AAAAAAAAEDk/UvMj9nzDyJI/design_float.png' width='16'/></td>
    <td height='24'><a expr:href='&quot;http://www.designfloat.com/submit.php?url=&quot; +data:post.url'><strong>Share on DesignFloat</strong></a></td>
    </tr>
    <tr>
    <td height='24'><img border='0' height='16' src='http://lh4.ggpht.com/_TqPdHmAEwTM/Sgxdp80sUoI/AAAAAAAAEDQ/3eYyxtWAGpM/s128/technorati.png' width='16'/></td>
    <td height='24'><strong><a expr:href='&quot;http://technorati.com/faves/?add=&quot; +data:post.url'>Share on Technorati</a></strong></td>

    </tr>
    <tr>
    <td height='24'><img alt='Feeds RSS' border='0' height='16' src='http://lh5.ggpht.com/_TqPdHmAEwTM/SgxdH0I91sI/AAAAAAAAEDA/cDcvpz3WJug/feed.png' width='16'/></td>
    <td height='24'><a href='http://feeds2.feedburner.com/BloggerFAQs'><strong>Subscribe to Feeds RSS</strong></a>
    </td>
    </tr>
    </table></td>
    </tr>
    </table>
    </div>
    <div class='spacer' style='margin-top:10px;margin-bottom:10px;border-top:solid 1px #DEDEDE;margin-bottom:10px;'/>
    </b:if>
    <div style='clear: both; height:30px;'/>
  5. The only change you need to do in the above code is to replace http://feeds2.feedburner.com/BloggerFAQs with your blog feed URL.
  6. After that, save your template and you can see the icons in post footer but only on posts' pages.

Tuesday, June 16, 2009

Blogspot Tutorial: Add StumbleUpon Button in Posts

Add StumbleUpon Button in Blogger for Traffic

StumbleUpon is a popular social bookmarking site where users share their favorite web pages. You can add StumbleUpon button in the footer of each post. This button would make it easy for readers to share your blog content with the rest of the world. This can drive more traffic to your blog.

Lets Add the StumbleUpon Button!


1- Log in to your Blogger account and go to Design then Edit HTML tab.

2- Check Expand Widget Templates option and the page will automatically refresh.

3- Find the following line of code:

<data:post.body/>

The above code might be in this form:

<p><data:post.body/></p>

4- Paste the following code right after the above code:

<a expr:href='&quot;http://www.stumbleupon.com/submit?url=&quot; +data:post.url'><img alt='StumbleUpon' border='0' src='http://www.stumbleupon.com/images/small_su_logo.png'/>
</a>


5- Save your template and you're done.

Want More Buttons?


StumbleUpon has introduced many new badges/buttons with clear instructions, feel free to give 'em a try. Here is the link:

http://www.stumbleupon.com/buttons/

Blogspot Tutorial: Add a Twitter Retweet Button in Posts

How to Add a Twitter Retweet Button in Blogger-Blogspot Posts
You can easily add retweet buttons on your Blogger-Blogspot blog. Such buttons allow blog readers to share content on Twitter with others. When people will tweet about your blog, you'll get free marketing and traffic for your blog.

Whoa! We Can Use 2 Buttons Here!


Yes, we can add 2 different type of buttons provided by different sites. twitthis isn't very popular but tweetMeme is really shining out there. Anyways, both buttons will do same thing so it depends on your choice.

Add twitThis Twitter Retweet Button


Add Tweetthis Button in Your Blogger Posts to Get Massive Traffic

To add twitthis Twitter button, follow the following steps:

1- Go to Design and then Edit HTML tab.

2- Check Expand Widget Templates.

3- Find this tiny piece of code:

<b:if cond='data:post.title'>

4- Add following code just before the previous line of code:

<div style='float:right; margin-left:14px;'>
<a expr:href='&quot;http://twitthis.com/twit?url=&quot; + data:post.url + &quot;&amp;title=&quot; + data:post.title'><img alt='TweetThis Button' border='0' src='https://blogger.googleusercontent.com/img/b/R29vZ2xl/AVvXsEjLBoVLbbqjNpO6YVIDBXOSCGsxnowLwHFRRDQIVu0jxdRKh-wjCelrmHVT3W4XGWl5ABn5NaW2zv81jgsOU3vmsfRECPDm4E-P3MshyYwlSCr1gwpcP7_ahSTh7C2jxY8uRS94PawyVYg/s1600/Twitter.gif'/></a>
</div>


5- Now, we have added our button just below the posts, so save the template and see the result.

Add tweetmeem Twitter Retweet Button


Add Tweetthis Button in Your Blogger Posts to Get Massive Traffic
Adding tweetmeme Twitter Retweet button is also very easy. Just follow all the steps of twitthis Twitter Retweet button but the code to add in step 4 will be this:

<div style='float:right; margin-left:14px;'>
<script type='text/javascript'>
tweetmeme_url = &#39;<data:post.url/>&#39;;
</script>
<script src='http://tweetmeme.com/i/scripts/button.js' type='text/javascript'/>
</div>

Wanna Add Some More Such Buttons?


I've also written tutorials to add StumbleUpon button, many social bookmarking buttons and Facebook Share button. Feel free to check them out!

Thursday, June 4, 2009

How to Add Facebook Share Button in Blogger/Blogspot Posts

Add Facebook Share Button in Blogger Posts

Social media sites like Facebook & Twitter could be great source of quality traffic for any blog. You can also add a Facebook share button in each of your posts. This button will allow users to quickly share a post on Facebook.

Steps to Add Facebook Share Button Below Post Title


To add Facebook share button below post title, simply follow these steps:

  1. Back up your layout/template.
  2. Go to Layout then Edit HTML tab.
  3. Check Expand Widget Templates. The page will automatically refresh.
  4. Now find this code:
    <data:post.body/>
  5. Place the following code right before the code found in step 4:
    <!-- Facebook Button -->
    <div style='float: left; padding: 5px; '>
    <a expr:share_url='data:post.url' name='fb_share' rel='nofollow' type='TYPE OF BUTTON'/>
    <script src='http://static.ak.fbcdn.net/connect.php/js/FB.Share' type='text/javascript'/>
    </div>
    <!-- Facebook Button -->

    The result should look something like this:
    <!-- Facebook Button -->
    <div style='float: left; padding: 5px; '>
    <a expr:share_url='data:post.url' name='fb_share' rel='nofollow' type='TYPE OF BUTTON'/>
    <script src='http://static.ak.fbcdn.net/connect.php/js/FB.Share' type='text/javascript'/>
    </div>
    <!-- Facebook Button -->
    <data:post.body/>
  6. Click Preview button to see the result and then save your template.

Add Facebook Share Button Below Post Body


To place the Facebook share button under each post, you have to follow the exact steps given above but step 5 is a little changed.

5- Place the following code right below the code found in step 4:
<!-- Facebook Button -->
<div style='float: left; padding: 5px; '>
<a expr:share_url='data:post.url' name='fb_share' rel='nofollow' type='TYPE OF BUTTON'/>
<script src='http://static.ak.fbcdn.net/connect.php/js/FB.Share' type='text/javascript'/>
</div>
<!-- Facebook Button -->

The result would look something like this:
<data:post.body/>
<!-- Facebook Button -->
<div style='float: left; padding: 5px; '>
<a expr:share_url='data:post.url' name='fb_share' rel='nofollow' type='TYPE OF BUTTON'/>
<script src='http://static.ak.fbcdn.net/connect.php/js/FB.Share' type='text/javascript'/>
</div>
<!-- Facebook Button -->

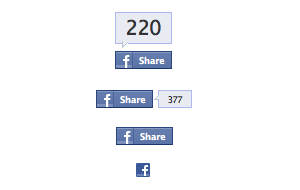
Button Modifications


You can also change the button type like adding a counter with the button. All you need is to replace TYPE OF BUTTON from the above code with:

button for a button like this:


button_count for a button like this:


box_count for a button like this:


icon for a button like this: