Thursday, May 21, 2009

What are Meta Tags & How to Add Meta Tags in Blogger/Blogspot

What are Meta Tags & How to Add Meta Tags in Blogger

Meta tags have vital importance because they can bring traffic from search. By default, Blogger blogs don't contain such tags but you can easily add them. However, when you add a meta tag in Blogger, it is applied to all the pages/posts of the blog. So, search engines consider this an illegal act and your blog can be punished. In this tutorial, I'll tell you what are meta tags and how to add them in Blogger without duplicate problem.

What are Meta Tags?


Meta Tags are tiny pieces of code and contain vital info of a web page like description & keywords. When a search engine like Google visits a blog, it checks for meta tags and uses the meta tags data to index the web page.

Example: Wikipedia Meta Tags


If you search for Wikipedia on Google, this is the result.

Wikipedia on Google


The line Wikipedia, the free encyclopedia that anyone can edit. is actually the meta description tag. To confirm this, you can check the source of Wikipedia homepage by going to view-source:http://www.wikipedia.org/ and this is what you'll see:

Wikipedia Meta Tags

How to insert meta tags in Blogger?


There are many types of meta tags but the most important one is description meta tag. Just follow these steps to add that tag in your template.

1- Go to Layout then Edit HTML tab.

2- Find <head> tag and place the following code right after it:

<b:if cond='data:blog.pageType == data:blog.homepageUrl'>
<meta content='PUT BLOG DESCRIPTION HERE' name='description'/>
</b:if>


3- Just replace PUT BLOG DESCRIPTION HERE with your blog description. Write precise and short sentences which should clearly convey the cliche of your blog.

4- Now, search engines will see the meta description tag only on the homepage.

How your site will be displayed in search results?


This is how your blog will look like in search results. Of course, a clear description will force the reader to visit your site.

Saturday, May 16, 2009

How to Customize 'Older Posts' & 'Newer Posts' Links

How to Customize 'Older Posts' & 'Newer Posts' Links

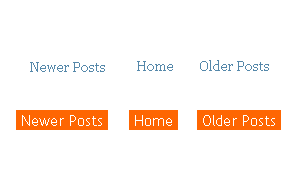
In this tutorial, I'll explain how you can customize or change "Older Posts" and "Newer Posts" links which are present at the bottom of your blog posts. By default, these links are just simple text and most of the users won't even notice that these are actually navigation links. However, we can simply add some spicy CSS (?) or replace these links with beautiful icons.

Important things first!


Before moving on, let me tell you that I'll be using Minima template during this tutorial. If you don't have Minima installed, you can simply install it by going to Layout tab then Pick New Template tab and chose Minima from there.

As we'll be making changes in the template HTML, so it would be better to backup your current layout just in case (?).

Find & Change the Default Styling Code for "Older Posts" & "Newer Posts"


We need to find & change the default code which is responsible for the appearance of blog navigation links. First of all, find the following code from the Layout -> Edit HTML tab:

#blog-pager-newer-link {
float: $startSide;
}

#blog-pager-older-link {
float: $endSide;
}

#blog-pager {
text-align: center;
}


This CSS code is responsible for the style and look of navigation links so just replace the above code with the following:

#blog-pager-newer-link {
float: $startSide;
}

#blog-pager-older-link {
float: $endSide;
}

#blog-pager {
text-align: center;
font: $navfont;
}

#blog-pager a, #blog-pager a:visited {
color: $navcolor;
background: $navbgcolor;
padding: 5px;
}

#blog-pager a:hover {
color: $navhovercolor;
background: $navhoverbgcolor;
padding: 5px;
}

Make Navigation Links Customizable Through Fonts & Colors Tab


To edit the links through Fonts and Colors tab, we need to do some more coding work. Don't worry, for you, it will be only copy-paste stuff. Now, in Edit HTML tab, scroll down a little and you'll see some code like this:

/* Variable definitions
====================
<Variable name="bgcolor" description="Page Background Color"
type="color" default="#fff" value="#ffffff">
<Variable name="textcolor" description="Text Color"
type="color" default="#333" value="#333333">
<Variable name="linkcolor" description="Link Color"
type="color" default="#58a" value="#5588aa">


Please note that I'm not displaying the full code, this is just to give you an idea. Alright, now you have to put the following code in the above mentioned code [View Screen Shot]:

<Variable name="navcolor" description="Links Text Color"
type="color" default="#fff" value="#ffffff">
<Variable name="navhovercolor" description="Links Text Hover Color"
type="color" default="#000" value="#000000">
<Variable name="navbgcolor" description="Links Background Color"
type="color" default="#FE6602" value="#FE6602">
<Variable name="navhoverbgcolor" description="Links Background Hover Color"
type="color" default="#FFD25F" value="#FFD25F">
<Variable name="navfont" description="Links Font"
type="font"
default="normal normal 15px 'Trebuchet MS',Trebuchet,Arial,Verdana,Sans-serif" value="normal normal 15px 'Trebuchet MS',Trebuchet,Arial,Verdana,Sans-serif">


Save your template and resulting code in Edit HTML tab would look something like this [View Screen Shot]!

So, now coding time is over and you can simply go to the Fonts and Colors tab and start editing the "Older Posts" & "Newer Posts" links. You'll find them at the top of the list there.

Links Text Color


It will only change the color of all the navigation links and you'll be able to see the preview instantly.

Links Text Hover Color


This setting represents the color of the links when mouse comes over the link otherwise known as hover effect. You won't see the preview of this setting. To see the result, you'd have to save changes and then see the blog in real time.

Links Background Color


This is the background color of the links in normal state and it can be seen instantly in preview mode.

Links Background Hover Color


Again, this is the background color only when mouse comes over the link and you'd have to save and then see the template to see the result.

Links Font


It will allow you to modify the font of navigation links.

Change the "Older Posts" & "Newer Posts" Text


You can also change the text and replace it with something else like Next & Previous. Before moving on make sure you check Expand Widget Templates.

Change "Older Posts"


Find <data:olderPageTitle/> and replace it with something else like Previous or Previous Page. This text is actually "Older Posts".

Change "Newer Posts"


Find <data:newerPageTitle/> and replace it with some other text like Next or Next Page. This text actually prints "Newer Posts".

Final Words


I've tried my best to explain everything I know in the easiest possible way. This tutorial is free and helpful so please help promoting it by sharing it with friends, commenting here, linking to this tutorial page or main page. If you need any kind of help regarding Blogger, feel free to ask.

Thursday, May 14, 2009

Blogspot Tip: How to Control Comments in Asian Languages

Block Spam or Unwanted Comments in Blogger

Many of you might have experienced unwanted comments (aka spam) comments on your blogs. Most of times these comments are linked to some other sites which might include porn sites as well. Sometimes such comments also contain hatred and use of offensive language against someone which could really upset your visitors. Fortunately, Blogger offers a powerful way to control and block spam or unwanted comments on your blog. Our goal is to block the bad guys, but at the same time, we must make sure that regular visitors don't get annoyed by our settings.

I Receive Comments in Strange Japanese, Asian or Chinese Characters!


Most commonly, you'll see comments in strange characters rather than English or some other known language. People often complain about getting comments in Chinese or Japanese languages which contain massive links to phishing or maybe porn sites. So, you really need to stop them.

The Solution: Block Such Comments with Comments Settings!


To change comments settings, log in to Blogger and go to Settings and then Comments. This section is all about comments and I'll explain the important settings one by one.

Who Can Comment?


You have to chose which kind of people can comment on your blog. If you have a public blog, make sure you chose the 1st option Anyone - includes Anonymous Users. It will allow anyone to comment on your blog.

Comment Form Placement


If you've post pages enabled then chose Embedded below post which is the most popular option. your comment form will appear at the bottom of post. However, if your blog doesn't allow post pages then chose any other option.

Comment Form Message


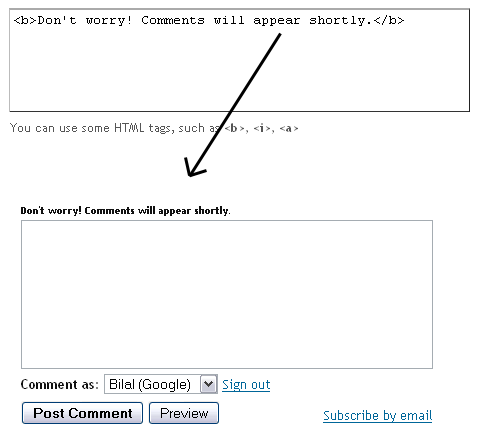
This is very useful but normally underrated option. Add some text in this box and then that text will appear right above your comment form on your blog. If the comments on your blog appear only after your manual approval, then you can simply use a message like "Don't worry! Comments will appear shortly."
How to Block Spam or Unwanted Comments

Comment moderation


Here comes the vital option. Chose Always from the options. This way, all the comments on your blog will be visible only after your approval. Whenever someone will comment (except blog author), a message will be displayed on the dashboard and from there you can approve or reject the comments. Blogger has explained the option in detail here.

Show word verification for comments?


This option will prompt the visitor to write a word from an image before posting a comment. I'd recommend to chose No for this option because it is really annoying. If you're getting far too many spam comments, only then turn it on.

Show profile images on comments?


This is a new addition and lets you display the profile images with comments. I've disabled it for my blog because each profile image means more time to load the page.

Final Words


I've tried to explain the important options regarding comments. A blog is popular only if it gets a lot of comments so make sure you work hard to get people interact. If you've any more questions, feel free to comment, thanks.