Monday, January 19, 2009

How to Decorate Blogger Comments

By default, Blogger comments are very simple with a profile picture but I'll tell you a simple way to make your comments look stylish, beautiful & completely customizable.

Remember: Before proceeding, please backup your current template layout. (?)

Find & Change the Default CSS Code for Comments


To do this quick makeover, just go to Layout then Edit HTML section. Find this code there:

/* Comments
----------------------------------------------- */
#comments h4 {
margin:1em 0;
font-weight: bold;
line-height: 1.4em;
text-transform:uppercase;
letter-spacing:.2em;
color: $sidebarcolor;
}

#comments-block {
margin:1em 0 1.5em;
line-height:1.6em;
}
#comments-block .comment-author {
margin:.5em 0;
}
#comments-block .comment-body {
margin:.25em 0 0;
}
#comments-block .comment-footer {
margin:-.25em 0 2em;
line-height: 1.4em;
text-transform:uppercase;
letter-spacing:.1em;
}
#comments-block .comment-body p {
margin:0 0 .75em;
}
.deleted-comment {
font-style:italic;
color:gray;
}


Tip: If you can't find this code then please comment here with your blog address otherwise continue with the tutorial.


Actually, this is the CSS code responsible for the appearance of your comments. So, you need to replace the above code with the following code:

/* Comments
----------------------------------------------- */

.comment-form {
margin-left:.5em;}

.comments {
margin-left:.5em;}

#comments h4 {
margin:1em 0;
font-weight: bold;
line-height: 1.4em;
text-transform:uppercase;
letter-spacing:.2em;
color: $commentheadingcolor;
}

#comments-block {
font-size:13px;
}
#comments-block .comment-author {
color: $commentauthorcolor;
font-size:12px;
background: $commentauthorbackcolor;
padding:4px;
font-weight:bold;
text-decoration:none;
}
#comments-block .comment-author a:link, .comment-author a:visited, .comment-author a:hover {
font-weight:bold;
color: $commentauthorcolor;
border-bottom:solid 1px $authorborderbottom;
padding-bottom:2px;
text-decoration:none;
}

dd{margin:0; border:0; padding:0; padding:0 10px; background: $bodybackcolor; color: $bodytexcolor;}
dd.comment-body{border:solid 2px $bodysidesbordercolor; border-bottom:none; border-top:none;}
dd.comment-body p{border:0; padding:0; margin:0; padding:10px 0;}
dd.comment-footer{border:solid 2px $footerbordercolor; border-top:none; margin-bottom:10px;}

#comments-block .comment-footer {
margin:-.25em 0 2em;
line-height: 1.4em;
text-transform:uppercase;
letter-spacing:.1em;
}

.comment-timestamp{font-size:11px; color: $commentdatecolor;}
.comment-timestamp a:link, .comment-timestamp a:visited {
font-size:11px; color: $commentdatecolor; background:none; width:auto; height:auto;
text-align:left; font-weight:normal;}


.deleted-comment {
font-style:italic;
color:gray;
}


Save the template and see the comments. You'd notice that the comments are now looking really decent and stylish.

Add the Customization Code in CSS


We've changed the default styling for comments after adding the code in previous step but everyone has different taste so let's add some juicy code to the template's HTML. Now, scroll down a little and you'll find this piece of code:

/* Variable definitions
====================


Right after the above code, you need to add the following code:

<Variable name="commentheadingcolor" description="Comments Heading Color" type="color" default="#0B486B" value="#0B486B">
<Variable name="commentauthorcolor" description="Comment Author Color" type="color" default="#53524b" value="#53524b">
<Variable name="commentauthorbackcolor" description="Comment Author Background Color" type="color" default="#d7e8f0" value="#d7e8f0">
<Variable name="authorborderbottom" description="Comment Top Border Color" type="color" default="#80a8ba" value="#80a8ba">
<Variable name="bodybackcolor" description="Comment Body Background Color" type="color" default="#f5f8fa" value="#f5f8fa">
<Variable name="bodytexcolor" description="Comment Text Color" type="color" default="#333" value="#333333">
<Variable name="bodysidesbordercolor" description="Comment Sides Border Color" type="color" default="#d7e8f0" value="#d7e8f0">
<Variable name="footerbordercolor" description="Comment Bottom Border Color" type="color" default="#d7e8f0" value="#d7e8f0">
<Variable name="commentdatecolor" description="Comment Date Color" type="color" default="#999999" value="#999999">


Now, the overall code should look something like this:

/* Variable definitions
====================
<Variable name="commentheadingcolor" description="Comments Heading Color" type="color" default="#0B486B" value="#0B486B">
<Variable name="commentauthorcolor" description="Comment Author Color" type="color" default="#53524b" value="#53524b">
<Variable name="commentauthorbackcolor" description="Comment Author Background Color" type="color" default="#d7e8f0" value="#d7e8f0">
<Variable name="authorborderbottom" description="Comment Top Border Color" type="color" default="#80a8ba" value="#80a8ba">
<Variable name="bodybackcolor" description="Comment Body Background Color" type="color" default="#f5f8fa" value="#f5f8fa">
<Variable name="bodytexcolor" description="Comment Text Color" type="color" default="#333" value="#333333">
<Variable name="bodysidesbordercolor" description="Comment Sides Border Color" type="color" default="#d7e8f0" value="#d7e8f0">
<Variable name="footerbordercolor" description="Comment Bottom Border Color" type="color" default="#d7e8f0" value="#d7e8f0">
<Variable name="commentdatecolor" description="Comment Date Color" type="color" default="#999999" value="#999999">


Save your template. Now, you can go to the Fonts & Colors section and customize all the colors according to your taste.

Thursday, January 15, 2009

Blogspot How To: How to Restore Pencil to Edit Posts


When you're logged in to your Blogger account and you see your own blog, you might have noticed a small pencil in your post footer. This pencil lets you easily edit any post right from your blog but if you're using a custom template or for some other reason, you can't see this small tool then you can easily restore or recover it.

Go to Settings | Basic and scroll down to the option to see Show Quick Editing on your Blog? just make sure it is selected "Yes" and SAVE SETTINGS. Now see your blog if the pencil is there or not. If pencil is still not there then you can manually add it's code in your template.

To manually add pencil code, go to Layout | Edit HTML | Check Expand Widget Templates and search for <div class='post-footer'> paste the following code right after it:


<b:if cond='data:post.editUrl'>
<span expr:class='&quot;item-control &quot; + data:post.adminClass'> <span expr:class='"item-control "+ data:post.adminClass'>
<a expr:href='data:post.editUrl' expr:title='data:top.editPostMsg'> <a expr:href='data:post.editUrl' expr:title='data:top.editPostMsg'>
<img alt='' class='icon-action' height='18' src='http://www.blogger.com/img/icon18_edit_allbkg.gif' width='18'/> <img alt='' class='icon-action' height='18' src='http://www.blogger.com/img/icon18_edit_allbkg.gif' width='18'/>
</a> </ a>
</span> </ span>
</b:if> </ b: if>


Save your template and see the results.
How to Restore Pencil to Edit Posts

Wednesday, January 7, 2009

Blogspot Tutorial: Add a Cool Animated Favicon in Blogger


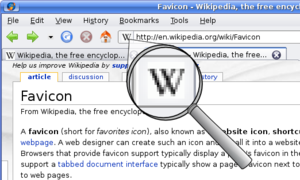
What is a favicon?


A favicon (short for favorites icon), also known as a website icon, shortcut icon, url icon, or bookmark icon is a 16x16 (or 32x32) pixel square icon associated with a particular website or webpage. (Wikipedia.Org)

How to install an animated favicon in a Blogger blog?


Go to Layout | Edit HTML and find </b:skin>. Paste the following code right after </b:skin> but before </head> tag. It should look like this:


</b:skin>

<link href='URL of .ico file' rel='shortcut icon' type='image/x-icon'/>

<link href='URL of animated .gif file' rel='icon' type='image/gif'/>

</head>


Remember: I'm using two files (.ico & .gif) because old internet browsers like Internet Explorer cannot display an animated favicon so we need to add a .ico file for this purpose.


How to find and upload .gif and .ico files...


You can search on Google for keywords like "animated favicons" or "free .ico favicons" and then you can upload your files to Google Sites for free.

Add a Cool Animated Favicon in Blogger

Monday, June 14, 1999

Blogger (Blogspot) Tutorials

Here you can find all the tutorials I've written so far. The list includes tutorials on Comments, Backup, Basic, Common Errors, Favicon, Fonts, Hacks, Header, Videos, Search Engine Optimization, Images, Links, Social Networking, Tracking Visitors & Widgets.


Blogger Backup Tutorials


These backup tutorials are vital for every Blogger user. You can download your blog posts and template at any time for backup.
  1. How to Download or Backup Blog Posts Using Blogger (Blogspot) Export Feature
  2. How to Download or Backup a Blogger (Blogspot) Template

Blogger Posts Tutorials


Posts tutorial include post title, body, footer and comments tutorials.
  1. How to Change Post Title Color in Blogger Template Designer Templates
  2. How to Change Post Title Position to Center in New Blogger (Blogspot) Templates
  3. How to Change Post Title Background Color in Blogger (Blogspot) Templates
  4. How to Enable Threaded Comments in Customized Blogger (Blogspot) Templates
  5. How to Change Post Title Color in Picture Window Blogger (Blogspot) Template
  6. How to Change Jump Break (Read More) Link Color, Font & Background Color in Blogger (Blogspot) Templates
  7. How to Create a Picture Link in Blogger (Blogspot) Posts
  8. How to Add Adsense Ads Below Post Titles in Blogger (Blogspot) Templates
  9. How to Change Post Body Font Size, Style & Color

Blogger Sidebar Tutorials


Use sidebar tutorial to change look and feel of gadgets and the sidebar as a whole.
  1. How to Change Sidebar Background Color in Blogger (Blogspot) Templates
  2. How to Change Sidebar Gadget Title Background Color in Blogger (Blogpsot) Templates
  3. How to Add Image as Sidebar Background in Blogger (Blogspot) Templates
  4. How to Add Image as Sidebar Gadget Title Background in Blogger (Blogspot) Templates
  5. How to Change Sidebar Title Font, Size & Color [Outdated]
  6. How to Leave Sidebar Gadget Title Field Blank in Blogger (Blogspot) Templates

Blogger SEO (Search Engine Optimization) Tutorials


SEO or Search Engine Optimization is a widely used term. In SEO tutorials, you'll find techniques to get better rank in search results and make your blog search engine friendly.
  1. Blogger Blogspot SEO (Search Engine Optimization) for Dummies
  2. How to Submit Blog Sitemap to Google Via Google Webmaster Tools
  3. How to Submit Blog Sitemap to Google Via Google Webmaster Tools [Video]
  4. How to Submit Blog URL to Google
  5. Submit Blog URL to Google, Yahoo & Bing Search Engines
  6. How to Quickly Get a Blogspot Blog Indexed by Search Engines
  7. Adding Unique Meta Tags for Each Post in Blogger

Blogger Links Tutorials


Links are an important part of any blog or website. A well-linked blog ranks higher in search engine. These tutorials will help you with links in Blogspot.
  1. Creating a Picture Link in Blogger Posts
  2. How to Change Jump Break (Read More) Link Color, Fonts & Background Color in Blogger Template Designer
  3. How to Post Links in Comments
  4. How to Customize "Older Post" & "Newer Posts" Links

Blogger Images Tutorials


Here are some tutorials to help you upload and use images in Blogger.
  1. How to Make Images Not Clickable (No Enlarge)
  2. How to Add Image as Blog Background
  3. How to Post Large High Quality Images
  4. How to Host Images on Blogger
  5. I'm Not Able to Upload Images on Blogger
  6. How to Add Image as Sidebar Background
  7. How to Add Image as Sidebar Heading Background
  8. How to Add Image as Header Background
  9. How to Add Your Own Image as Blog Background in Blogger Designer Templates